Start here
If you've ever felt locked into a single AI assistant — like your history, your custom instructions, and the way you've learned to talk to it all live in one place you can't reach — this walkthrough is for you. OpenAI added a way to export your full ChatGPT history, and the tools on the other side have gotten good enough that the move is genuinely practical now. What follows is a five-part walkthrough that takes you from clicking Export in ChatGPT to having your full conversation history loaded into a new assistant that can actually see it. No data loss, no developer required, and no permanent goodbye.
A note on timing before you start: the actual hands-on work is about 30–45 minutes, but OpenAI can take up to 7 days to email you the export once you request it. Plan to request the export first, then come back and finish the rest while you wait.
Who this is for
You are tired of ChatGPT — the limits, the lock-in, the feeling that years of conversations live on someone else's servers. You want to move to another AI assistant (Claude, Cursor, a Letta agent, or anything else that supports MCP).
You do not need to be a programmer. You do need to follow steps in order, copy commands carefully, and wait for OpenAI's export email.
What you will have at the end: your ChatGPT conversations searchable from your new assistant, running on your computer. Your data stays local unless you choose to put it somewhere else.
What this guide does not move automatically: ChatGPT Memory (the personal context ChatGPT remembers about you across sessions), your bio, or your custom instructions. Those are copy/paste from ChatGPT settings into your new app (covered at the end).
The big picture (four steps)
The route is simple:
- Export from ChatGPT. OpenAI emails you a ZIP of your chats.
- Open that export in ChatGPT Browser. You clean and browse the export locally on your computer.
- Download one clean memory file. ChatGPT Browser creates a canonical-only database your new AI can search.
- Connect your new assistant. origin_conversation lets any MCP-capable assistant search that file.
MCP (Model Context Protocol) is just a standard way for an AI app to use tools on your computer. In plain terms: you open the new assistant's settings, paste a short configuration, save — and you're telling it where to find your old conversations. Think of MCP like a USB port shape — if the app supports it, our memory bridge plugs in.
Before you start
- A computer: Windows 10/11 or Mac (macOS 10.15+). Linux folks can usually adapt these steps; this doc doesn't walk Linux explicitly.
- Disk space: at least 2 GB free (more if you have huge chat history).
- Email access to the inbox tied to your ChatGPT account (OpenAI sends the export link there).
- Same login everywhere: request the export while logged into the same ChatGPT account you use day to day. If you signed up with Google on the website and use a different login in the desktop app, switch to one consistent account before you export — mixed logins are the most common reason the download fails.
- Plan type: full export works on Free, Plus, and Pro. Not available on ChatGPT Business or Enterprise through the normal Account path (per OpenAI's help article).
- Time: installing tools ~30–45 minutes once; waiting for OpenAI's email can take up to 7 days.
Create one folder for everything so paths stay simple:
| OS | Suggested folder |
|---|---|
| Windows | C:\Users\YourName\chatgpt-migration |
| Mac | ~/chatgpt-migration |
Replace YourName with your actual Windows username.
Part 1 — Export your data from ChatGPT
Official instructions: How do I export my ChatGPT history and data?
OpenAI's help page is text-only (no screenshots as of 2026). Below is what you should see in the ChatGPT website.
Step 1.1 — Open ChatGPT in a browser
Go to https://chatgpt.com and sign in.
Step 1.2 — Open Settings
- Look at the bottom-left of the page.
- Click your profile picture or initials (the small circle in the corner).
- Click Settings.
You should see a settings panel with a menu on the left.
Step 1.3 — Data Controls → Export
- In the left menu, click Data controls.
- Find the section Export data.
- Click Export.
- On the confirmation screen, click Confirm export.
ChatGPT will tell you that export was requested. You are not done yet — the file does not download immediately.
Step 1.4 — Wait for the email
- The export email comes from an OpenAI noreply address (something like
noreply@tm.openai.com). - Check Inbox, Spam, and Promotions.
- Export can take up to 7 days. Only the most recent export request counts; starting a new one cancels older ones.
- The download link expires after 24 hours once the email arrives — download promptly.
Step 1.5 — Download and unzip
conversations.json inside. That is your chat history source file.- In the email, click Download data export.
- Save the
.zipfile to yourchatgpt-migrationfolder.
A zip file (.zip) is a single file that contains a folder of files compressed into a smaller size — like a packed suitcase. You "unzip" it to get the original files back.
- Unzip the file:
- Windows: right-click the ZIP → Extract All…
- Mac: double-click the ZIP (Archive Utility opens it)
Inside you should find conversations.json — a single file that holds your full chat history in a structured form. Keep that file safe. You will import it in Part 3.
Troubleshooting export
| Problem | What to try |
|---|---|
| Email never arrives | Wait the full 7 days; check spam; request export again |
| Download says "Not Found" | Log into ChatGPT with the same account you used to request export |
| Business / Enterprise account | Use the Privacy Portal path in OpenAI's article, or full export isn't available on your plan |
Part 2 — Install Python
Both tools in this guide run on Python — free software that runs small programs on your computer. Installing means: download one file, open it, click through the prompts (if Windows asks whether you trust the app, choose yes).
Windows
- Go to https://www.python.org/downloads/windows/.
- Download the latest Python 3.12 or 3.13 installer (64-bit).
- Run the installer.
- Important: on the first screen, check "Add python.exe to PATH" (bottom of the window). PATH is a list of places your computer looks for installed programs — checking this box tells your computer where to find Python when you type
pythonlater. - Click Install Now and finish.
Verify — open PowerShell (Start menu → type PowerShell → open). PowerShell is a text window where you type instructions and press Enter:
python --versionYou should see something like Python 3.13.x. If you get "not recognized," reinstall Python with Add to PATH checked.
Mac
- Go to https://www.python.org/downloads/macos/.
- Download the latest macOS 64-bit universal2 installer.
- Open the
.pkgand follow the prompts.
Verify — open Terminal (Spotlight → type Terminal). Terminal is a text window where you type instructions and press Enter:
python3 --versionYou should see Python 3.12.x or 3.13.x.
Part 3 — Install ChatGPT Browser (viewer + cleanup)
.db memory file.ChatGPT Browser is a small website that runs on your own computer. It opens your OpenAI export, lets you read your old chats, and produces the memory file your new assistant will read from. You only need to run it once per export — and again whenever you grab a fresh export from OpenAI.
Repo: github.com/actuallyrizzn/chatgpt-browser
Step 3.1 — Download the project (no Git required)
The commands below download a zip file from GitHub and unpack it into your migration folder. If you don't already have a chatgpt-migration folder, create one first — anywhere convenient, like your home directory or Desktop.
Windows (PowerShell) — PowerShell is the text-based command app on Windows. Open it from the Start menu.
cd C:\Users\YourName\chatgpt-migration Invoke-WebRequest -Uri "https://github.com/actuallyrizzn/chatgpt-browser/archive/refs/heads/main.zip" -OutFile chatgpt-browser.zip Expand-Archive -Path chatgpt-browser.zip -DestinationPath . Rename-Item chatGPT-browser-main chatgpt-browser cd chatgpt-browserMac (Terminal) — Terminal is the text-based command app on Mac. Open it from Applications → Utilities.
cd ~/chatgpt-migration curl -L -o chatgpt-browser.zip https://github.com/actuallyrizzn/chatgpt-browser/archive/refs/heads/main.zip unzip chatgpt-browser.zip mv chatGPT-browser-main chatgpt-browser cd chatgpt-browserStep 3.2 — Create a virtual environment and install
A virtual environment is a private folder where this project's tools live, kept separate from the rest of your computer. It avoids version conflicts and keeps things tidy. Run the commands below in order, from inside the chatgpt-browser folder you just created.
Windows (PowerShell):
python -m venv .venv .\.venv\Scripts\Activate.ps1 python -m pip install --upgrade pip pip install -r requirements.txt python init_db.pyIf PowerShell blocks the activate command with a "running scripts is disabled" message, run this once:
Set-ExecutionPolicy -Scope CurrentUser RemoteSignedThen try the activate command again.
Mac (Terminal):
python3 -m venv .venv source .venv/bin/activate python -m pip install --upgrade pip pip install -r requirements.txt python init_db.pyWhen the virtual environment is active, your prompt will show (.venv) at the start. That's the visual cue that the next commands will run inside the private environment.
Step 3.3 — Start ChatGPT Browser
Windows:
python app.pyMac:
python app.pyLeave this window open and running for the next step. Then open a regular web browser (Chrome, Firefox, Safari, Edge — any of them) and go to:
http://localhost:5000
You should see the ChatGPT Browser home page. The conversation list will be empty until you import your export in the next step.
Step 3.4 — Import your ChatGPT export
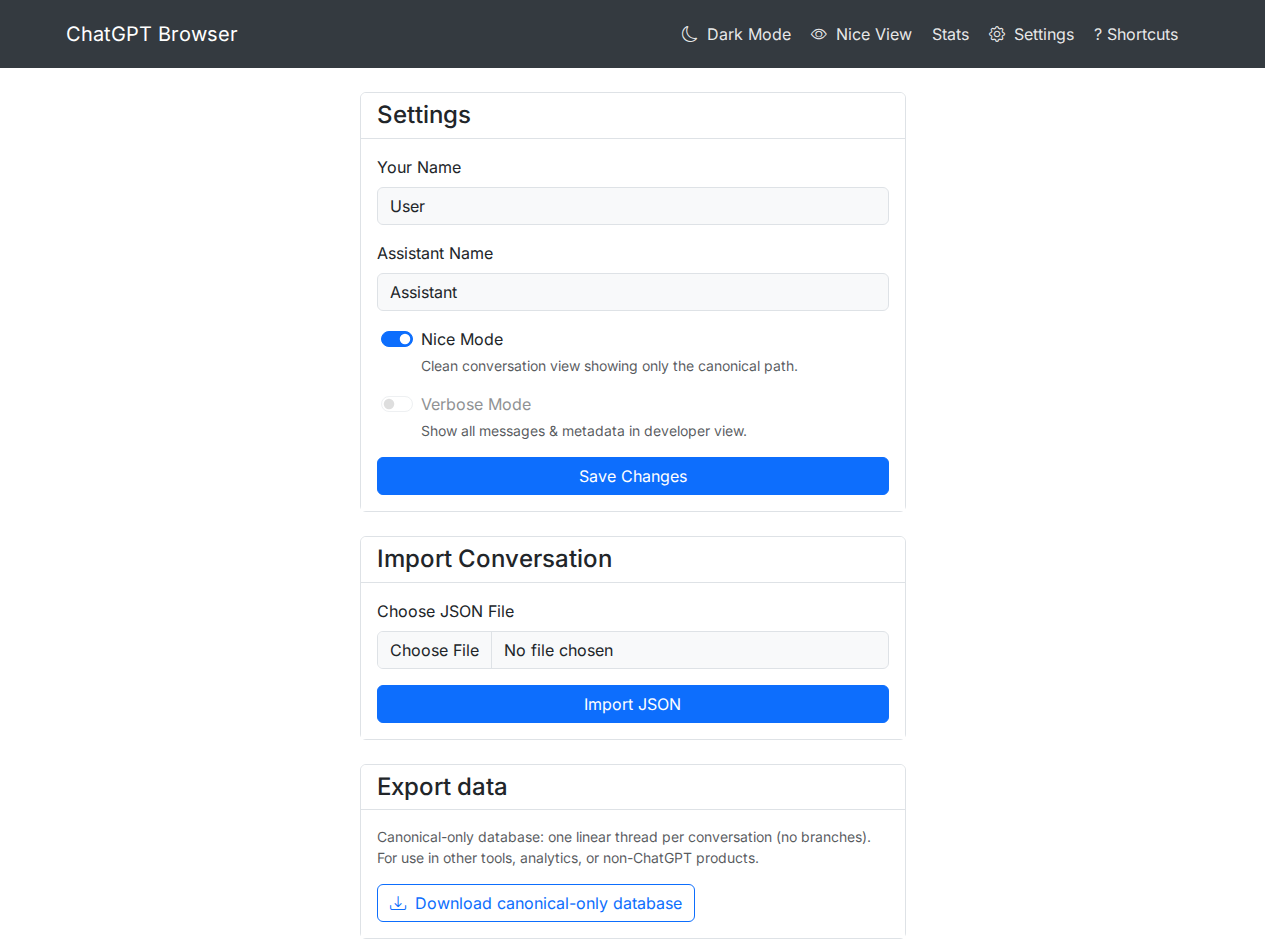
ChatGPT Browser runs locally. The Settings page is where you import conversations.json and download the clean memory file.
- In ChatGPT Browser, click the gear icon (Settings) in the navigation bar.
- Scroll to the Import Conversation section.
- Click Choose JSON File and select your
conversations.jsonfrom the unzipped OpenAI export. - Click Import JSON.
- Wait for the success message. Large histories can take several minutes — the page may look frozen, but it's working.
When the import finishes, the home page will list all your conversations.
Step 3.5 — Download the canonical-only database
Still on Settings, scroll down to the Export data section.
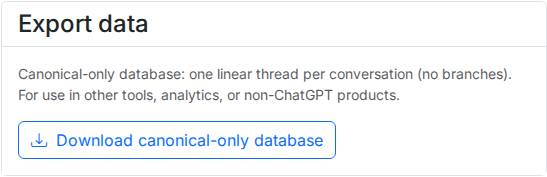
You'll see a label that reads something like:
Canonical-only database: one linear thread per conversation (no branches). For use in other tools…
A canonical-only database is a single, portable file (.db) that contains your full ChatGPT history in a clean, linear form — one thread per conversation, no branching side-streams. It's the format other tools can read.
Click Download canonical-only database.
Save the file into your migration folder, for example:
- Windows:
C:\Users\YourName\chatgpt-migration\canonical-export.db - Mac:
~/chatgpt-migration/canonical-export.db
This .db file is your portable ChatGPT memory. Keep it somewhere safe — you'll point at it from the next part.
You can stop ChatGPT Browser now (press Ctrl+C in the terminal window, or just close the window). You'll only need it again when you want to refresh your export with newer conversations.
Part 4 — Install origin_conversation (MCP memory bridge)
origin_conversation is the small program that lets your new AI assistant actually read the .db file. It runs quietly in the background and exposes a tool called conversation_search — your assistant uses that tool to look up old chats by keyword, date, or topic.
MCP (Model Context Protocol) is the standard way modern AI assistants connect to outside tools and data. You don't need to know how it works internally — just that origin_conversation speaks it, and your new assistant can talk to it.
Repo: github.com/sanctumos/origin_conversation
Step 4.1 — Download the project and copy in your memory file
These commands download origin_conversation and copy the .db file you produced in Part 3 into the right place inside the new project.
Windows (PowerShell):
cd C:\Users\YourName\chatgpt-migration Invoke-WebRequest -Uri "https://github.com/sanctumos/origin_conversation/archive/refs/heads/main.zip" -OutFile origin-conversation.zip Expand-Archive -Path origin-conversation.zip -DestinationPath . Rename-Item origin_conversation-main origin_conversation cd origin_conversation mkdir db copy ..\canonical-export.db .\db\canonical-export.dbMac (Terminal):
cd ~/chatgpt-migration curl -L -o origin-conversation.zip https://github.com/sanctumos/origin_conversation/archive/refs/heads/main.zip unzip origin-conversation.zip mv origin_conversation-main origin_conversation cd origin_conversation mkdir -p db cp ../canonical-export.db db/canonical-export.dbStep 4.2 — Install the MCP server
Same pattern as Part 3: create a virtual environment, activate it, install the project.
Windows (PowerShell):
python -m venv .venv .\.venv\Scripts\Activate.ps1 pip install -e .Mac (Terminal):
python3 -m venv .venv source .venv/bin/activate pip install -e .Step 4.3 — Quick test (optional)
This command starts the MCP server. It should start, print a couple of lines, and then sit quietly — that silence is correct. The server is just waiting for a connection. Press Ctrl+C to stop it.
Windows:
python -m origin_conversation_mcpMac:
python -m origin_conversation_mcpYou don't need to keep this running day to day. Your AI app will start it for you automatically once you finish Part 5.
Write down this path — you need it in Part 5:
| OS | Path to the Python program inside the virtual environment |
|---|---|
| Windows | C:\Users\YourName\chatgpt-migration\origin_conversation\.venv\Scripts\python.exe |
| Mac | /Users/YourName/chatgpt-migration/origin_conversation/.venv/bin/python |
This is the actual program file that runs the MCP server. Replace YourName with your real username before you use it.
Part 5 — Connect your new AI assistant
-m origin_conversation_mcp argument.Now the wiring. Pick one of the apps below — they all do the same thing, just in different shapes. Whichever you pick, you'll paste in the Python path from Part 4.3 and the argument -m origin_conversation_mcp. That's it. Your assistant will then be able to search your full ChatGPT archive.
Option A — Claude Desktop (simplest for most people)
- Install Claude Desktop if you haven't already.
- Quit Claude completely — closing the window isn't enough; use Quit / Exit from the menu so it actually stops running in the background.
- Open Claude's MCP config file. This is a small text file Claude reads every time it starts:
- Windows: press
Win+R, type%APPDATA%\Claude, press Enter. Openclaude_desktop_config.jsonin Notepad. If the file doesn't exist, create it. - Mac: in Finder, press
Cmd+Shift+G, paste~/Library/Application Support/Claude/, press Go. Openclaude_desktop_config.jsonin TextEdit. If the file doesn't exist, create it.
- Paste the content below into the file, replacing the path with the one you wrote down from Part 4.3:
Windows example:
{ "mcpServers": { "my-chatgpt-history": { "command": "C:\\Users\\YourName\\chatgpt-migration\\origin_conversation\\.venv\\Scripts\\python.exe", "args": ["-m", "origin_conversation_mcp"], "env": {} } } }Mac example:
{ "mcpServers": { "my-chatgpt-history": { "command": "/Users/YourName/chatgpt-migration/origin_conversation/.venv/bin/python", "args": ["-m", "origin_conversation_mcp"], "env": {} } } }- Save the file. Reopen Claude Desktop.
- Look for the MCP / tools indicator (a small hammer icon in some versions). If it's connected, Claude can search your history.
Try it. In a new Claude conversation, ask something you know you discussed in ChatGPT:
"Search my ChatGPT history for conversations about [topic you know you discussed]."
If Claude returns relevant results, you're done.
Option B — Cursor
Cursor is a code editor that also talks to AI assistants. It has first-class MCP support.
- Open Cursor Settings → MCP (or Features → MCP, depending on version).
- Add a new MCP server with these two fields:
- Command: the Python path from Part 4.3
- Args:
-mandorigin_conversation_mcp(two separate entries, in that order)
- Save. Restart Cursor if prompted.
Option C — Letta (self-hosted agents, including Sanctum)
If you run Letta locally or on a Sanctum box, add an MCP server entry to your agent's config:
- Command: the Python path from Part 4.3
- Args:
["-m", "origin_conversation_mcp"]
The tool works the same way as Letta's built-in conversation search — but it searches your full ChatGPT archive rather than only what the agent has seen since it was created.
More detail: MCP_CLIENTS.md.
Option D — Other MCP-compatible apps
Any app that supports stdio MCP (the local-server flavor) can run the same command. The pattern is always the same:
- Command: the Python path from Part 4.3
- Args:
["-m", "origin_conversation_mcp"]
Check the app's "local MCP server" documentation for where to paste those two values.
Part 6 — Bring over Memory and custom instructions (manual)
ChatGPT’s export does not include:
- Saved Memory entries
- Your bio / “what should ChatGPT know about you”
- Custom instructions
To carry that context forward:
- In ChatGPT → Settings → Personalization / Custom instructions / Memory.
- Copy the text you care about.
- Paste into your new assistant’s equivalent (Claude’s project instructions, Letta memory blocks, Cursor rules, etc.).
Your conversation search tool handles chat history; this step handles who you are to the model.
Part 7 — Updating your history later
ChatGPT won’t sync live. When you want a fresh snapshot:
- Export again from ChatGPT (Part 1).
- Import the new
conversations.jsonin ChatGPT Browser (Part 3.4). - Download a new canonical
.dbfile. - Replace
origin_conversation/db/canonical-export.dbwith the new file (or drop the new file indb/and delete the old one — the server uses the newest.dbin that folder). - Restart your AI app (or let it restart the MCP server).
Troubleshooting
| Symptom | Likely cause | Fix |
|---|---|---|
python not found (Windows) | Python not on PATH | Reinstall Python; check Add to PATH |
pip install fails | No internet or old pip | python -m pip install --upgrade pip then retry |
| ChatGPT Browser won’t open | Port 5000 in use | Close other apps using port 5000; or stop other python app.py |
| Import fails | Wrong file | Use conversations.json from OpenAI’s ZIP |
| MCP tool missing in Claude | Bad JSON or wrong path | Check paths use \\ on Windows; quit Claude fully and reopen |
| Search returns nothing | Empty or wrong DB | Confirm .db is in origin_conversation/db/ |
| “Not Found” on OpenAI download | Wrong account | Same login as export request |
What you built (in one sentence)
You took ownership of your ChatGPT transcripts, cleaned them into a local memory file, and plugged that file into any MCP assistant — so your next AI can search years of context without staying on ChatGPT.
Links
| Resource | URL |
|---|---|
| OpenAI export help | https://help.openai.com/en/articles/7260999-how-do-i-export-my-chatgpt-history-and-data |
| ChatGPT Browser | https://github.com/actuallyrizzn/chatgpt-browser |
| origin_conversation | https://github.com/sanctumos/origin_conversation |
| MCP overview | https://modelcontextprotocol.io/ |
| Technical MCP client details | MCP_CLIENTS.md |
| Developer-oriented getting started | GETTING_STARTED.md |
Written by Idalia Ward, with technical research and implementation assistance from Otto Vernal.